Commonly used forms like Sales orders or Projects
in Dynamics AX have multiple grids. Normally, one grid is in the upper
section and another one is in the bottom section of the form. Sometimes
grids are placed next to each other.
The size of the data in
each grid may vary, and that's why most of the forms with multiple grids
have splitters in the middle so users can resize both grids at once by
dragging the splitter with the help of a mouse. It is a good practice to
add splitters to newly created forms.
Although Microsoft developers
did a good job by adding splitters to most of the multi-grid forms,
there is still at least one that has not got it. It is the Account reconciliation form in the Bank module, which is one of the most commonly used forms. It can be opened from Bank | Bank Account Details, Functions | Account reconciliation button, and then the Transactions button. In the following screenshot, you can see that the size of the bottom grid cannot be changed:
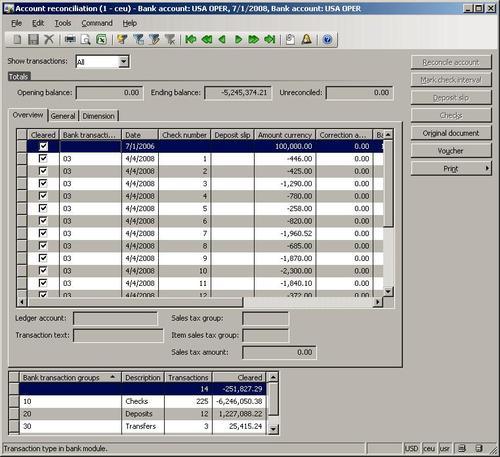
In this recipe, we will
demonstrate the usage of splitters by resolving this situation. We will
add a form splitter in the middle of the two grids in the mentioned
form. It will allow users to define the sizes of both grids to make sure
that the data is displayed optimally.
How to do it...
1. Open the BankReconciliation form in AOT, and create a new Group at the very top of the form's design with the following properties:
|
Property
|
Value
|
|---|
|
Name
|
Top
|
|
AutoDeclaration
|
Yes
|
|
FrameType
|
None
|
|
Width
|
Column width
|
2. Move the AllReconciled, Balances, and Tab controls into the newly created group.
3. Create a new Group right below the Top group with properties:
|
Property
|
Value
|
|---|
|
Name
|
Splitter
|
|
AutoDeclaration
|
Yes
|
|
Width
|
Column width
|
|
Height
|
5
|
|
FrameType
|
Raised 3D
|
|
BackgroundColor
|
Window background
|
|
HideIfEmpty
|
No
|
|
AlignChild
|
No
|
4. Add the following line of code to the bottom of the form's class declaration:
5. Add the following line of code to the bottom of the form's init():
fs = new SysFormSplitter_Y(Splitter, Top, element);
6. Override three methods in the Splitter group with the following code:
public int mouseDown(
int _x,
int _y,
int _button,
boolean _ctrl,
boolean _shift)

{
return fs.mouseDown(_x, _y, _button, _ctrl, _shift);
}
public int mouseMove(
int _x,
int _y,
int _button,
boolean _ctrl,
boolean _shift)

{
return fs.mouseMove(_x, _y, _button, _ctrl, _shift);
}
public int mouseUp(
int _x,
int _y,
int _button,
boolean _ctrl,
boolean _shift)

{
return fs.mouseUp(_x, _y, _button, _ctrl, _shift);
}
7. Change the following properties of the existing BankTransTypeGroup group:
|
Property
|
Value
|
|---|
|
Top
|
Auto
|
|
Width
|
Column width
|
|
Height
|
Column height
|
8. Change the following property of the exiting TypeSums grid located in BankTransTypeGroup group:
|
Property
|
Value
|
|---|
|
Height
|
Column height
|
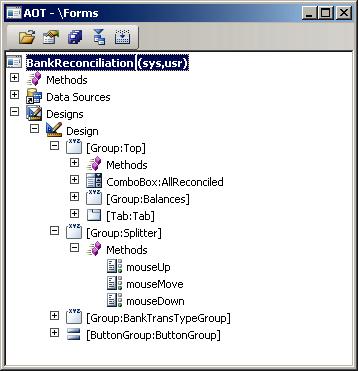
9. In AOT the Modified BankReconciliation form should look like the following screenshot:
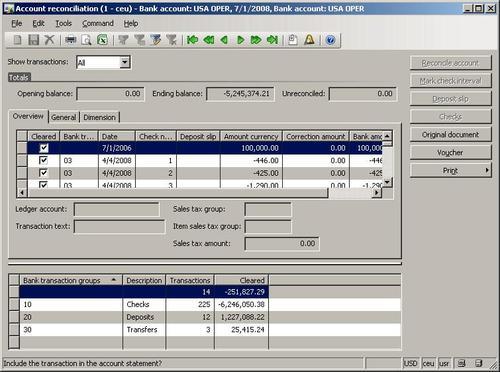
10. Now, to test the results, open Bank | Bank Account Details, select any bank account, click Functions | Account reconciliation, choose an existing or create a new account statement, and click the Transactions
button. Notice that now the form has a nice splitter in the middle,
which makes the form look better and allows defining the size of each
grid:
How it works...
Normally a splitter is placed between two form groups. In this recipe, to follow that rule, we need to adjust the BankReconciliation form's design. The filter AllReconciled, the group Balances and the tab Tab are moved to a new group called Top. We do not want this new group to be visible to user, so we set FrameType None. Setting AutoDeclaration to Yes
allows us to access this object from X++ code. And finally, we make
this group automatically expand in the horizontal direction by setting
its Width to Column width. At this stage, visual form layout did not change, but now we have the upper group ready. to
The BankTransTypeGroup group could be used as a bottom group with slight changes. We change its Top behavior to Auto and make it fully expandable in the horizontal and vertical directions. The Height of the grid inside this group also has to be changed to Column height in order to fill all the vertical space.
In the middle of those
two groups, we add a splitter. The splitter is nothing else but another
group, which looks like a splitter. In order to achieve that, we set Height 5, FrameType to Raised 3D, and BackgroundColor to Windows background. This group does not hold any other controls inside. Therefore, in order to make it visible, we have to set the property HideIfEmpty to No. The value No of the property AlignChild makes the splitter begin on the very left side of the form and the Column width value of the property Width forces the splitter to automatically fill the form's width. to
Mouse events are handled by the SysFormSplitter_Y application class. After it has been declared in the form's class declaration, we create the actual object in the form's init(). We pass the name of the splitter control, the name of the top group and the form itself as arguments when creating it.
A fully working splitter requires three mouse event handlers. It is implemented by overriding the mouseMove(), mouseDown(), and mouseUp() methods in the splitter group control. All arguments are passed to the respective member methods of the SysFormSplitter_Y class which does all the job.
In this way, horizontal
splitters can be easily added to any form. The Dynamics AX application
also contains nice examples about splitters, which can be found in AOT
in the Tutorial_Form_Split
form. Vertical splitters can also be added to forms using a very
similar approach. For this, we need to use another application class
called SysFormSplitter_X.